Jenkins Setup Using AWS Autoscaling Group

I am a software engineer (Cloud /DevOps Enthusiast. Talks about DevOps | AWS | Docker | Linux | Jenkins | Git | Terraform | Technical Blogger).I have a strong ability to troubleshoot and resolve issues, and are consistently motivated to expand the knowledge and skills through exploration of new technologies.
What’s the best way to run Jenkins on AWS
As Jenkins is still a popular automation server used for continuous integration and deployment.
Jenkins is integrated with the Git repository to pull the source code and perform analysis, build the project, execute the unit testing, and finally deploy the application on the production servers. These tasks are automated sequences of stages to provide continuous release of the software. workflow from Git to production using Jenkins to incorporate continuous code changes and bug fixes by the development and testing teams.
Challenges
Manual & very slow-paced traditional software release process
Poor Time to Market
Complicated and Manual testing processes
Weak competitive advantage
Poor adapt to change
Poor customer experience
High application downtime
Error-prone manual operations
1.) solution to establish continuous and automated software development and release processes using :
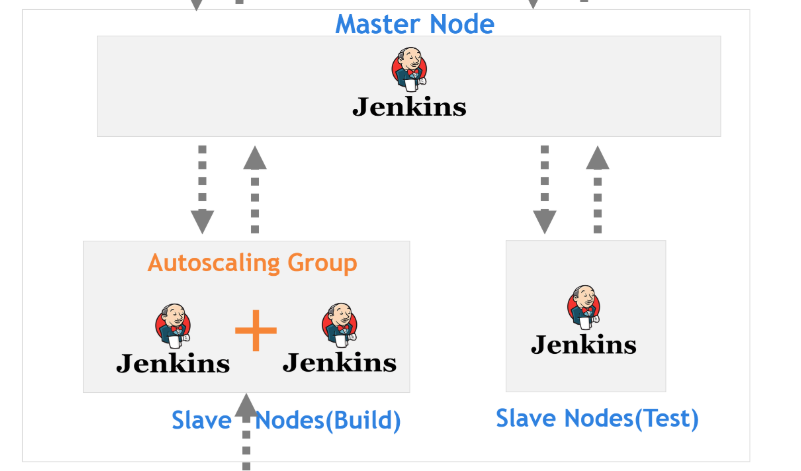
Jenkins with a master and slave architecture for automated build and testing
An Auto Scaling Group (ASG) to ensure an EC2 instance running the Jenkins controller is up and running 24/7.
The Jenkins plugin ec2 launches and terminates EC2 instances acting as Jenkins agents automatically.
An Application Load Balancer (ALB) acts as the entry point for users and forwards the incoming request to the Jenkins controller. On top of that, the ALB terminates HTTPS and handles authentication.
The Cognito User Pool provides a secure way to authenticate with Jenkins. By the way, replacing the Cognito User Pool with any OpenID Connect compatible identity provider is possible.
An Elastic File System (EFS) is used to ensure no data is getting lost when replacing the Jenkins controller in case of a failure or rolling update.
Backup takes snapshots of EFS to be able to restore data from a point-in-time snapshot. For example, to recover from a human error.
All EC2 instances send metrics and logs to CloudWatch. Alarms notify operators in case of problems. Also, operators have access to centralized logs to analyze issues.
The Simple E-Mail Service allows Jenkins to send notifications to engineers. For example, to notify about failed jobs.
Engineers access EC2 instances using the Sytems Manager Session Manager in a very secure manner. The Session Manager replaces SSH and, therefore, publicly accessible inbound ports.
2.) How to set up an auto-scaling group for Jenkins in AWS:
To set up an auto-scaling group for Jenkins in AWS, follow these steps:
Launch an EC2 instance for Jenkins in your preferred region.
Install Jenkins and any necessary plugins on the instance.
Create an Amazon Machine Image (AMI) of the Jenkins instance, which will be used to launch new instances in the auto-scaling group.
Create an IAM role that allows the auto-scaling group to launch and terminate instances and access other AWS resources such as S3 buckets or RDS instances.
Create a launch configuration that includes the AMI and IAM role, as well as any additional configurations such as instance type and security group settings.
Configure the auto-scaling group with the launch configuration, specifying the desired minimum and a maximum number of instances to be running at any given time.
Optionally, set up a load balancer to distribute traffic among the instances in the auto-scaling group.
Here are more detailed instructions:
Launch an EC2 instance for Jenkins in your preferred region:
Go to the EC2 console in the AWS Management Console.
Click "Launch Instance" and select an Amazon Machine Image (AMI) for your instance.
Choose an instance type and configure any necessary settings such as storage, network, and security groups.
Launch the instance.
Install Jenkins and any necessary plugins on the instance:
Connect to the instance using SSH or Remote Desktop, depending on your operating system.
Follow the instructions to install Jenkins on the instance.
Install any necessary plugins.
Create an Amazon Machine Image (AMI) of the Jenkins instance:
In the EC2 console, select the Jenkins instance.
Right-click on the instance and select "Create Image".
Give the image a name and description, and choose whether to reboot the instance before creating the image.
Click "Create Image" to create the image.
Create an IAM role:
In the IAM console, click "Roles" and then "Create Role".
Select "AWS service" as the type of trusted entity and choose "EC2" as the service that will use the role.
Attach a policy that allows the role to launch and terminate instances, and access any other necessary AWS resources.
Give the role a name and description.
Create a launch configuration:
In the EC2 console, go to the "Auto Scaling Groups" page and click "Create Launch Configuration".
Choose the AMI you created earlier.
Select the IAM role you created earlier.
Choose the instance type, storage, and other settings for the instances in the auto-scaling group.
Configure any necessary security groups and other settings.
Review and create the launch configuration.
Configure the auto-scaling group:
In the "Auto Scaling Groups" page, click "Create Auto Scaling Group".
Choose the launch configuration you created earlier.
Specify the minimum and maximum number of instances you want in the auto-scaling group.
Choose the VPC and subnets where the instances will be launched.
Configure any necessary scaling policies and notifications.
Review and create the auto-scaling group.
Optionally set up a load balancer:
In the EC2 console, go to the "Load Balancers" page and click "Create Load Balancer".
Choose the type of load balancer you want to create and configure it according to your needs.
Add the instances in the auto-scaling group to the load balancer's target group.
Update your DNS settings to point to the load balancer's DNS name.
3.) Scaling with Amazon Web Services (AWS) and the EC2 Fleet plugin
Another way to manage Jenkins scalability is with EC2 (Amazon Elastic Compute Cloud) containers and the EC2 Fleet plugin.
This option suits teams that:
- Already have access to AWS
Though AWS comes at a cost, your financial limits are set at an account level.
Configuring AWS
Sign up for AWS if you don’t have an account
or
Log into your account if you already have access.
Step 1: Create a policy
Start by creating a policy to allow access to use AWS EC2 Spot Fleet and the Auto Scaling Group:
Click the Services menu at the top, select Security, Identity, & Compliance then IAM.
Click Policies from the left menu under the Access Management heading.
Click Create Policy from the right.
Create a new policy with the visual editor to use both EC2 Spot Fleet and Auto Scaling Group. Alternatively, use the JSON editor and paste in the code from the plugin’s setup guide.
Click Next: tags.
Add tags if needed then click Next: Review.
Give the policy a name and description and click Create policy.
Step 2: Create an IAM user with programmatic access
Now you create a user with the programmatic access and assign the new policy to it:
Click the Services menu at the top, select Security, Identity, & Compliance and then IAM.
Click Users from the left menu under the Access Management heading.
Click Add Users from the right.
Give your account a suitable name, select Access key – Programmatic access and click Next: Permissions.
Click the Attach existing policies directly button. Search for the policy you created in the previous step, tick the checkbox to the left and click Next: Tags.
Add tags if needed then click Next: Review.
Review your new user and click Create user.
Step 3: Set credentials to connect AWS to Jenkins
Next, you create both authentication methods needed to connect AWS to Jenkins.
First, set an access key ID for your newly created IAM user. This will allow Jenkins to see information related to your AWS setup. To set the access key ID:
Click the Services menu at the top, select Security, Identity, & Compliance and then IAM.
Click Users from the left menu under the Access Management heading.
Search for and click the IAM user you created in step 2.
Go to the Security credentials tab and click Create access key.
Make a note of both the access key ID and the secret access key (click show to see it) and keep it somewhere safe, such as a password manager. You can only see the secret access key at this stage, and you’ll need to create a new one if you lose it.
Now you create a key pair. This allows Jenkins to connect to the instances that AWS will create when scaling. To set a key pair:
Click the Services menu at the top, select Compute and click EC2.
Click Key Pairs in the left menu under the Network & Security heading.
Click Create key pair.
Complete the following options and click Create key pair:
Name – give the key pair a descriptive name.
Key pair type - leave as RSA.
Private key file format – select .pem.
Tags – add if needed.
The private key will automatically download in a text file. Keep this file safe, you need it later.
Step 4: Create an AWS EC2 Spot Fleet or an Auto Scaling Group
You can either create an EC2 Spot Fleet or an Auto Scaling Group. In this example, we created an EC2 Spot Fleet, but check the AWS documentation if you want more info about creating Auto Scaling Groups.
Before starting, you should also have a clear idea about what Amazon Machine Image (AMI) you want to use. An AMI is a pre-built image that includes the operating system and software your EC2 Fleet will create extra machines from.
Your AMI image should include Java 11 as Jenkins won’t scale without it. We use the OpenJDK 11 Java 11 Ubuntu 18.04 AMI from the AWS Marketplace, however, you could build your own if you need something specific. See AWS’s documentation for more information on AMIs.
To create an EC2 Spot Fleet:
Click the Services menu at the top, select Compute and click EC2.
Click Spot Requests from the left menu under the Instances heading.
Click Request Spot Instances.
Set the following options at a minimum – the others you can change as you need:
AMI – remember to select an AMI that includes Java 11.
Key pair name – select the key pair name we created in step 3.
Maintain target capacity – check this box.
Scroll to the bottom and click Launch when finished.
It takes a few moments for AWS to create your fleet. Then you can configure Jenkins.
Configuring Jenkins
Step 1: Install the EC2 Fleet plugin in Jenkins
To install the EC2 Fleet plugin:
Click Manage Jenkins from the menu.
Click Manage Plugins.
Click the Available tab and start typing
EC2 Fleetinto the Filter field. The plugin should appear in the predicted search results.Check the tick box to the left of the plugin then click Install without restarting.
Jenkins will install the plugin and all dependencies, including other plugins, extensions, and Amazon Software Development Kits (SDKs).
If you haven’t already, you should also install the Credentials Binding plugin.
Step 2: Add the AWS IAM account and key pair to Jenkins
To add your AWS IAM account:
Click Manage Jenkins from the menu.
Scroll down to the Security heading and click Manage Credentials.
Click Jenkins under the Stores scoped to Jenkins heading.
Click Global credentials (unrestricted) under the System heading.
If no credentials exist, you can click the How about adding some credentials? link, otherwise click Add Credentials from the left.
Complete the following fields and click OK:
Kind – Select AWS Credentials from the dropdown.
ID – Give the credentials a name you’ll use to identify the credentials in Jenkins.
Description – Enter a meaningful description.
Access Key ID – Enter the Access Key ID from when you created the IAM account in AWS.
Secret Access Key – Enter the access string from when you created the IAM account in AWS.
To add your key pair:
Click Manage Jenkins from the menu.
Scroll down to the Security heading and click Manage Credentials.
Click Jenkins under the Stores scoped to Jenkins heading.
Click Global credentials (unrestricted) under the System heading.
Click Add Credentials from the left.
Complete the following fields and click OK:
Kind – Select SSH Username with the private key from the dropdown.
ID – Give the credentials a name you’ll use to identify the credentials in Jenkins.
Description – Enter a meaningful description.
Username – This username is for the AMI you selected.
Private Key – Check the Enter directly radio button, click the Add button, and paste in the contents of the key pair file you downloaded earlier.
Step 3: Connect Jenkins to your AWS EC2 Spot Fleet
Now you connect Jenkins to the AWS EC2 Spot Fleet:

Click Manage Jenkins from the menu.
Click Manage Nodes and Clouds.
Click Configure Clouds.
Select Amazon EC2 Fleet from the Add a new cloud dropdown. Complete the following fields and click Save:
Name – Enter a descriptive name for use in Jenkins.
AWS Credentials – Select your Access Key ID from the AWS Credentials dropdown.
Region – Select your fleet’s EC2 fleet’s region from the dropdown.
EC2 Fleet – Any EC2 Spot Fleets connected to your Access Key ID will appear here. You may need to click Test Connection if the credentials aren’t showing.
Launcher – Select Launch agents via SSH, select the key pair credentials you added in Step 2 and Non-verifying Verification Strategy from both new dropdown boxes.
Step 4: Test everything is working
After a few minutes, go to your Jenkins dashboard. Under the Build Executor Status on the left, you should see both your controller instance and your new EC2 Fleet. If the EC2 fleet is showing any errors, click its name to see logs to identify the problem.
To test that Jenkins will now scale suitably, you can create simple build jobs to check how they’re distributed.
First, you want to set Jenkins so it won’t run jobs on the controller (unless you tell it otherwise):
Click Manage Jenkins from the menu.
Click Configure System.
Select Only build jobs with label expressions matching this node from the Usage dropdown, then click Save.
Now create a “Hello World” build job:
Click New Item from the Jenkins dashboard.
Enter a suitable name, such as
Testing, select Freestyle project and click OK.Under the Build heading, select Execute shell from the dropdown box.
Enter
echo "Hello World"into the Command box and click Save:
Run the build job and, if working correctly, you’ll see it appear under your fleet in the Build Executor Status on the left. Once complete, you can also check your build history to check exactly where the job ran.
Changing your scaling options in AWS
After it's set up and working, you can change how you want Jenkins to scale in AWS.
Log into AWS.
Click the Services menu at the top, select Compute and click EC2.
Click Spot Requests from the left menu under the Instances heading.
Click the Request ID of your EC2 Spot Fleet.
Scroll to the bottom of the page to see the scaling options. Click the Configure button under the Auto Scaling heading.
Change settings as you need and save.
Please, feel free to drop any questions in the comments below. I would be happy to answer them.
If you find this post helpful😊🙂, please follow and click the heart❤❤ button below to show your support.
_ Thank you for reading
_sandhya kumari


